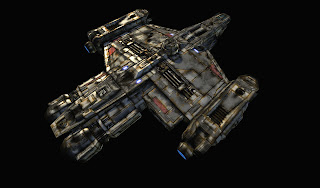
Finally, after a few days of trying to find the time to post i have done it. Here it is, the ship (mostly finalized) I have been working on for a while now. I say mostly because it always seems like I could keep tweaking something (which I probably will). When I set out to do this ship I thought a lot about what makes something like the Millenium Falcon and the Ebon Hawk cool (two very iconic Star Wars ships if your a fan, look these up if you don't know what I am talking about). So I set out to do something in that style but I also wanted it to be grounded in reality, Star Wars does a pretty good job but it never accounted for Newtonian Physics in space. That is why you will see thrusters all over the ship, placed strategically for quick maneuverability. Also the glowing blue devices around the ship I imagined as Shield emitters that bend the shield around the ship. I also thought about things like landing gear, where the loading ramp would be, how cargo would be moved in and out, the scale of the ship, and I even imagined how the interior might look. Anyway, there is my little nerd session.

Moving onto the model, you will notice that it now has the specular, glow, and normal maps. The armor itself also went through a few revisions. It was a little to heavy before so the armor now appears a little more subtle. It also has bigger chunks so it flows better (thanks to Michael for his awesome critique's!).

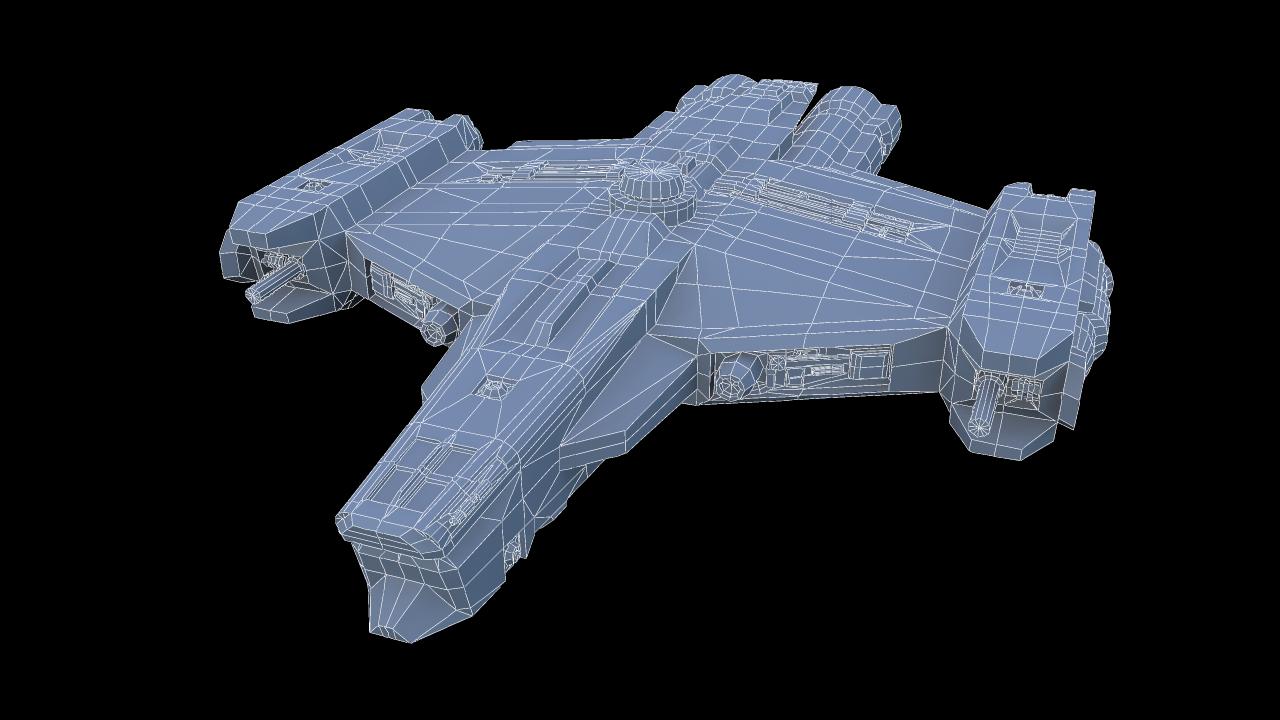
Finally I think I will post one more time after this to show the textures themselves. I may also post a montage picture of the different views of the ship (maybe). Someday, I may even post what the LOD models look like, If I find the time to get the texture reset for those. Well, this ship has been a blast from start to finish to work on, hopefully people enjoy looking at it as much as I enjoyed building it.

Updated progress


Another Update! This just shows some more progress that I have made with the texture. I have added rust and much more detail to the whole ship which should be obvious compared to the last post. I also spent a ton of time working out what I wanted to do with the armor I am not sure its final but it does look better than it did. You will also notice that I have added a normal map to give the ship a little more depth, that will also likely change as this was just to make sure the texture was set up to do it. The normal was generated with nDo which is a great plug-in tool for Photoshop. and I also have the start of my Emissive map although I like to just call it a glow map since that is exactly what it does, make things appear to glow it can also be used to create lights that cast across the texture.

Texture work in progress


Here is what I have been working on the past little while. As you can see it is still a work in progress. It is still lacking a specular map, reflective, glow, and a normal map. Much more detailed than my last texture which admittedly was kind of a mess. This time everything is easily changed and may still change as I continue to work on this. I am excited at how well it is turning out, its funny I started with a totally different approach to the modeling then I had in the past and I am doing the same with the texture. These screen-shots were taken in marmoset Tool-bag which renders in real time. The idea is to show what the model will look like in game. I plan to show the LOD models once I finish with the primary model. Then I will showcase all three in engine and hopefully the differences will be hard to spot.

So after what has seemed like forever I finally have a new update. So after my last post I still did not think the ship looked good enough. After some more feedback and a lot more work I have arrived at something I am more satisfied with. This will be the final update for this ship I think its time to move on to bigger challenges.

It has been a little longer than I thought it would take for me to post an update. Work on my latest model has been going well. I think I have managed to push it as far as I can with a 10k Tri count (at least that was the target budget I was going for). The actual Tri count sits about 150 Tri's above the 10k limit. The goal now is to set up the uv's and then Create two LOD models, one at 6k and another at 2k. From there I am going to create a high poly model to create a normal map.


This is the other project I have been working on. After I created the renders below, I got a bit of feedback and decided that I would try to improve it. So I did some studying online and found some reference and also did a bit of reading. I went back through the layers and made adjustments to the color of the main color, brightened up what used to be straight black and dialed back the dirt a bit. Once in Maya I switched the material to something better suited to metal. Using that material I loaded the color and diffuse back into the material. I also created a specular map, reflection map, glow map, and finally a bump map for some more detail. After going between maya and photoshop for quite a while, I finally got something that I thought was a big improvement over my previous attempt.

This is the new model I am working on. I started this one a little differently than the last. Instead of extruding from a box and building from there, I created the main shapes and placed them about where I wanted them. This way I could iron out the shape, scale, and overall silhouette. From there I welded everything together and started laying the proper topology out. It now consists of one object instead of many and I can now move forward with detail. I am considering building a high poly model so that I can use that as a normal map for the low poly model. If I don't, I will probably still put some detail in using a bump map created in photoshop. Hopefully I will have another update soon.


My ship model has come along way. The texture took far less time then the last model that I made a texture for. I approached it in a much better way, creating layers of detail that can be turned on or off. For example the dirty appearance of the ship can be turned off or the red can be turned to any color you want or turned off completely. I can change the color of the entire ship if I want but the Grey looks a little bit more real.
This is a digital painting done in Photoshop. It was just a speed painting done with no reference.


Here is some recent Design work that I have done for some of the clients I work with at A plus Printing and Design. All these designs, after being finalized by the client, are then seperated into individual colors for the screen printing process.


It has been a while since the last post, so here is a quick update. I tweaked the landing gear a little bit and added a little more detail to them as well. I also started to kind of mess around with adding in an enviornment and trying to light the scene. The hanger was built using just simple planes and boxes. I know it lacks a lot of detail but I wanted to get the look and feel right, along with proper lighting. Overall, I think the hanger is coming together nicely for something thrown together in just a few short hours. The ship still needs a little bit of work but I think its nearly done. The final thing will be to apply textures and then animate.


Another quick update. I have made some progress, I changed a couple of things that really did not work with the design over all. The most notable change is the landing gear and ramp that I have added.

New 3d model

I decided to take a small break from animation and do a little bit of modeling again. I always loved to model ever since I was little I used to build stuff out of Lego's, which was always fun and inventive. I also put together plastic models all the time, and Even built my own toy spaceships out of cardboard. Anyway, childhood obsessions aside I really do enjoy 3d modeling.
The model itself is still a work in progress, so far I have the basic shape and a few larger details worked out


In these Animations I decided to really focus on doing the animation in steps. In the past I usually just did straight ahead style animations. For some that may work out great but I figured out that it was harder to get the overall action timed correctly.

I decided to work on a weight lift animation. This was done using a combination of key framing and straight ahead posing.